adapted from Pixelated Mushrooms free pattern found via RAVELRY
Showing posts with label free pattern. Show all posts
Friday, 5 December 2014
Wednesday, 3 December 2014
Saturday, 15 November 2014
Monday, 3 November 2014
Votan Rat
Didn't realise I hadnt put this wee blighter up.
Votan Rat from the game Defiance.
You have to kill 15 of these in the Ravage Ridgecrest Pursuit to complete Solepton Excavation
Free pattern available on RAVELRY with instructions for normal rat included
Labels:
animal,
free pattern,
tv dude
Saturday, 1 November 2014
Assassins Egg Cosy
Ezio, Altair, Kenway and co are less likely to want to slit your throat if they have warm eggs in the morning :D
Labels:
free pattern,
geekery,
home decor
Thursday, 4 September 2014
Free Pattern Tiny Crochet Xmas Wreath
Perfect as a tree decoration using oddments, or for leaving little seaonal yarnbombs around your town
For the pictures I used an Aran weight (worsted/10ply) dark green yarn and a 5mm hook, but changing the yarn weight and hook size will determine the size. ie if you would like REALLY small ones using 4ply and a 2.5 hook, for larger use a bulky yarn and a 7mm or larger hook. You may also need to add or remove a DC or so at stage 3 to get a neat round wreath.
American terms used, for UK use Treble Crochet instead of DCs at stage 2 and 3
1. Chain 4, slip stitch into 1st chain to make a circle, chain 2
2. work a double crochet into the middle of the circle
3. Work a further 19 DC into the circle (total 20DC and the 2 chain)
4. Slip stitch into the top of the1st DC ... sew ends in neatly at back
5. Cut a length of contrast yarn for bow, knot around one of the DC make a bow, pull the bow loops to size and neaten.
Double knot the bow again to secure firmer if wished. Cut a length of contrast yarn for hanging (about 20cm), hold yarn in center and feed through top edge opposite the bow, pull both ends through loop and pull tight to create a hitch knot
6. either leave hanging loop ends open to tie to tree or knot ends together to create a loop. Further decorate with some glue and glitter or sequins if desired for that snowy/iced effect
Labels:
free pattern,
xmas,
yarnbomb
Sunday, 3 August 2014
Autism Awareness Beanie - free pattern link
Sproglet1 has Aspergers so it was fitting to design a simple-ish pattern to offer for others to make to help create awareness
There is intarsia used, but as it is blocks of colour it would be a good way for someone wanting to learn to give it a go. If you don’t want to do so tho you could knit the simple beanie and use the chart to duplicate stitch/swiss darn on the logo
This pattern is free to use for awareness purposes, please do not sell pattern, but please do feel free to donate to Autism and Aspergers charities.
Thank You
Labels:
beanie,
free pattern
Wednesday, 22 January 2014
Whirlm from Viva Pinata
Many, MANY moons ago got the game for Xbox 360
More recently Sproglet1 has gained an interest ... and asked for his own
SO, I made one .. and in case you would like to make one too HERE is my free fanart pattern
Labels:
free pattern,
gaming dude,
xbox
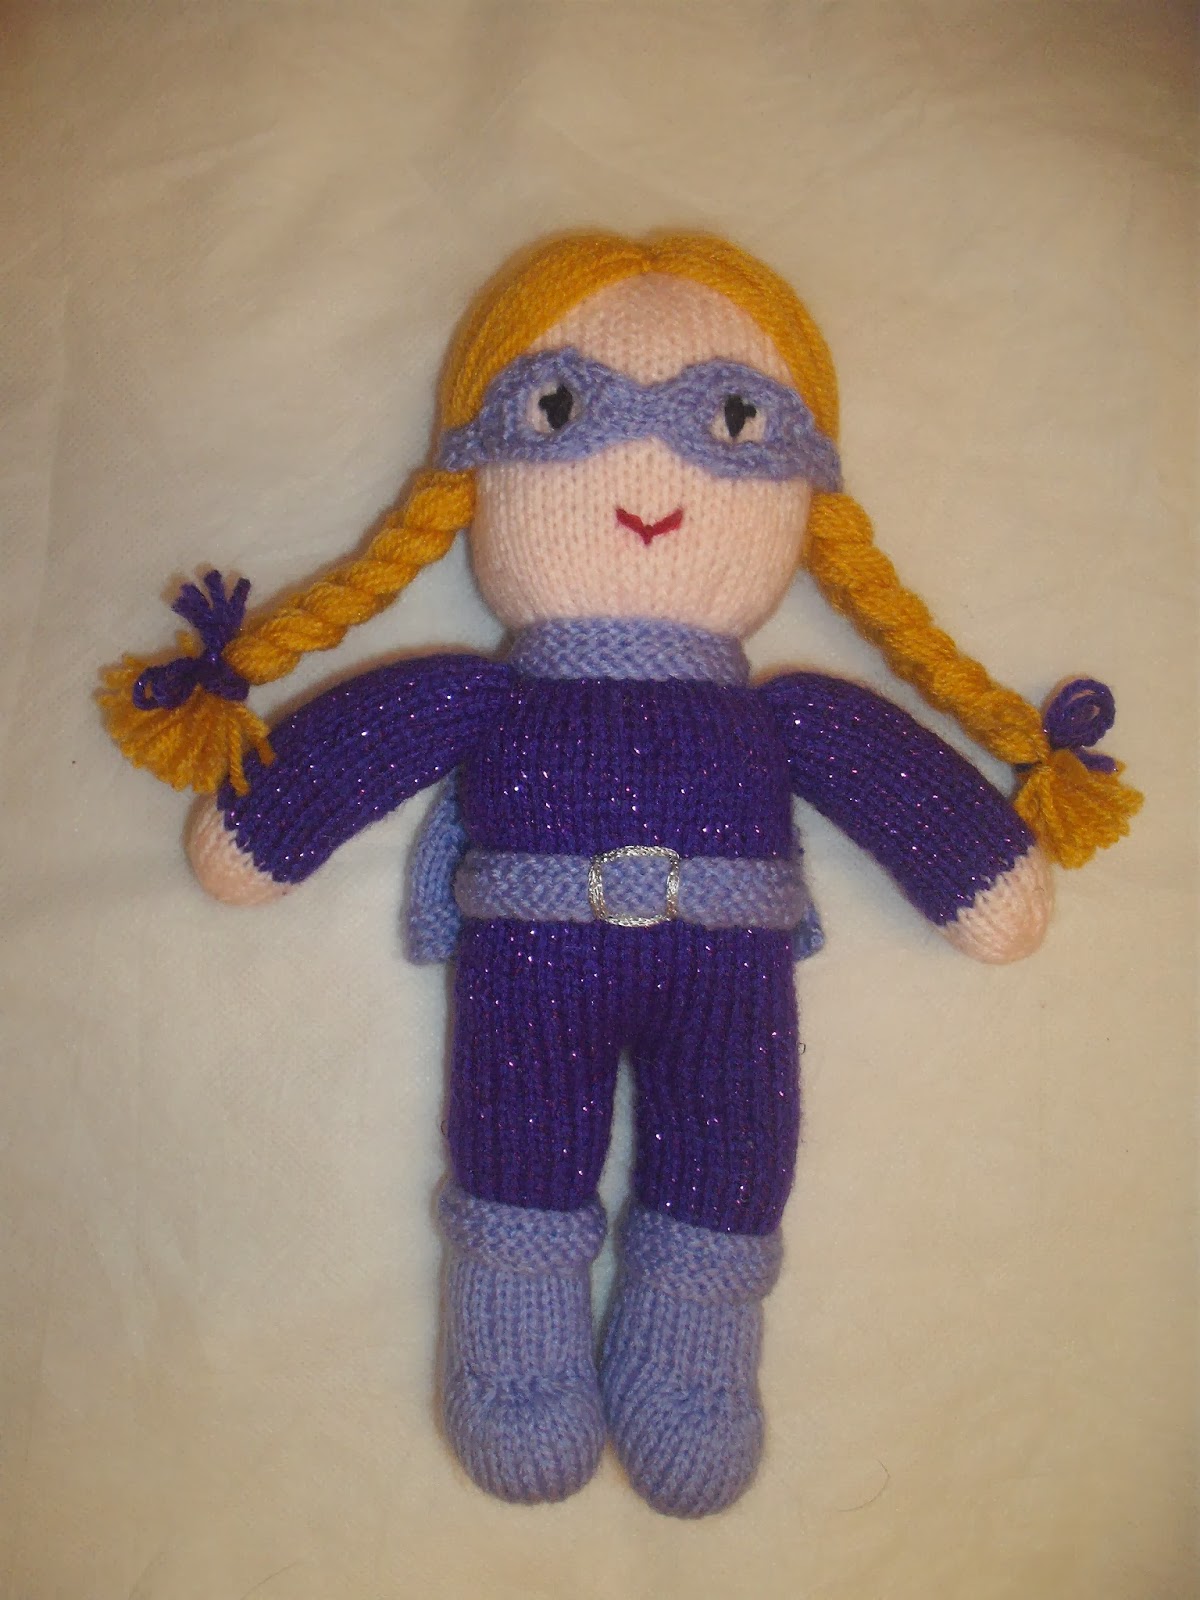
Super Suzy
Superhero Doll for a wee girl.
free pattern HERE
You dont get a good effect from the dark purple in the picture. Think of a Cadbury Dairy Milk purple with a metallic strand running thru it and you're close
Friday, 21 September 2012
Brians Baffies
Baffie is scottish slang for slippers.
My youngest decided he wanted new slippers and they had to be orange and he needed to wear them in bed ... tall order wee man.
So i had a quick nosy and thought Feck it i'll make my own up.
Big hook and double DK wool for speed and here they are. After making these orange ones the older one decided he wanted some too, only in red. No problem, time to run thru the pattern again. Funny thing is that even though there is 16 months between them (Feb 07 and June 08) they have EXACTLY the same foot size (6.5inch long and 7inch around the toejoin).
So this pattern is currently only for a UK kids size 10 to 10.5 for the moment, and with a bit of info from some friends I'll hopefully get other sizes sorted
Until then add or subtract a stitch or two or row or two to get a size to fit and please comment cos any other sizes help would be great :D. Feel free to ask and I could give a guestimate, much better to test on little feeties to be sure as it's easy to add an extra row at the back to make them longer.
The baffies are worked in the amigurumi style of a spiral (work into next stitch without slipping to join row and no chainup to next) to the opening, then back and forth so only a back seam to sew
MATERIALS
5.5mm crochet hook, Double Knitting Yarn in either 2 shades, or 1 shade held together, large eyed needle for sewing up. worked in sc (american single crochet or uk double crochet)
HOW make 2 identical
Holding 2 strands together chain 2
Work 8sc into the 2nd chain from hook
Increase in each stitch - 16sc
work (1sc, increase) around - 24sc
Work 14 rounds straight on the 24 stitches.
NR - chain 1 turn, work 22sc (leaves 2sc on previous round unworked), chain 1 turn
NR - sc along the 22 stitches, chain 1 turn
work last row a further 6 times (total of 8 rows worked flat)
NR - work 8 sc, decrease, 2 sc, decrease, 8sc - 20sc
NR - work 8sc, decrease, decrease, 8sc - 18sc
NR - work 7sc, decrease, decrease, 7sc - 16sc ... fasten off leaving a long thread to close seam.
fold back seam in half and sew the two sides together to make the back seam. neaten all ends.
It should look similar to this
Make another exactly the same and you should have this
Pop them onto little feeties like this
Labels:
free pattern,
slippers
Tuesday, 24 April 2012
Riddler inspired Toddler Mitts Free Pattern
I do love toddler mitts... a pair can be whizzed up in less than a couple of hours and no shaping needed. If you can do the basics these are easy peasy. For a one colour set follow the stitch count, ribbing and stocking stitch plain for the 16 rows the colourwork in the pattern below. Please note the instrusctions about where to start the colourwork, this will ensure the details are on the back of the hands.
Materials
4mm straight needles
Double Knitting Yarn in green and black,
(about 15grams green and 3 or 4 yards maximum of black, I havnt measured exact but it's very little of each)
the "?" chart below
tapestry needle
Method
make 2, 1 with pattern at start of row, 1 with pattern starting 1/2 way along as described below
using green cast on 32 sts
work K1,P1 rib for 12 rows
Purl 1 row (this gives a "clean" edge before the colourwork)
beginning with a K row work in stocking stitch for 16 rows working the "?" in black, twisting yarn behind work to prevent holes.
for the left hand work row 1 of the chart from the start of the row ... eg k7green, 2 black, k green to end. this will position the ? on the back of the hand when sewn up
for the right hand k 16 green, then work the 16sts of colourwork ... eg k23 (16+7) green, 2 black, k green to end. this will position the ? on the other side of the mitt and therefore will also be on the back of the hand when sewn up
the colourwork ends on a K row so again to keep a clean edge between the colourwork and the rib...
P 1 row
work a further 8 rows of K1,P1 rib, cast off in rib
Sew in the contrast ends neatly, then join the side seams leaving a gap of around6 or 7 rows for the thumb. I find starting the gap about 3 or 4 rows of stocking stitch down from the fingers end works quite well. See picture below for a visual description
Finally pop them on. I have them pictured below on my nearly 4yr old, they are quite stretchy so I would imagine they would fit up to at least 6, maybe a bit older. They can easily be made a little wider by adding a couple of stitches or upping the needle size... for example a 5mm needle using 36sts will fit a adult female hand. Also for a little longer and extra row or two on either rib band or on the plain stocking stitch rows.
Remember when adding on stitches this will change the position of the colourwork, please account for that as evenly as you can ... eg if working on 36sts there is 18sts on each side, so add 1 stitch on either side of the chart
Please link to Ravelry if you make some...thanks :D
BASIC PATTERN with some size examples
X= whatever number of stitches YOU need it to be depending on varying factors of hand circumference and needle size. If unsure make a quick tension square to check.
Cast on 32/34/36/X sts on 4/5mm needles
work 12 rows 1x1rib
work 18/22/24/X rows stocking stitch
work 8 more rows 1x1rib
Labels:
free pattern,
hero/villian,
mitts
Monday, 23 April 2012
Halo Plasma Grenade Free Pattern
Materials
3mm hook
dark blue DK yarn for main ball
red/rust/dark orange yarn for contrast piece
green yarn for embroidery
toy stuffing
tapestry needle
sc :- single crochet (us) or double crochet (uk)
inc :- work 2 sc in the sc of the round below
dec :- work 2 sc together of the round below
Worked in spirals, ie place marker and work in next sc, do not slip to join round and chain up to next
main grenade ball
1. using dark blue chain 2 , 6sc in 2nd chain from hook
2. (inc) to end - 12sc
3. (1sc, inc) to end - 18sc
4. (2sc, inc) to end - 24sc
5. (3sc, inc) to end - 30sc
6. (4sc, inc) to end - 36sc
7. (5sc, inc) to end - 42sc
8. (6sc, inc) to end - 48sc
9. to 20. work 12 rounds straight
21. (6sc, dec) to end - 42sc
22. (5sc, dec) to end - 36sc
23. (4sc, dec) to end - 30sc
24. (3sc, dec) to end - 24sc
25. (2sc, dec) to end - 18sc
26. (1sc, dec) to end - 12sc ... stuff ball with enough filling to hold a ball shape
27. (dec) to end - 6sc
break yarn leaving a long end. thread end through the remaining 6sc and pull tight to close the hole. sew ends through ball and snip close to work.
contrast piece
1. using red/rust/dark orange chain 12
2. sc in 2nd chain from hook, then sc in the next 9 chain. work 3sc in the last chain then turn work upside down and work in the unused loops of the chain, work 9sc along chain and 2sc in the last loop (this was the 1st sc of the round) - 24sc. place marker
3. inc, work 9 sc, inc, 1sc, inc, work 9sc, inc, 1sc - 28sc
4. 1sc, inc, 9sc, inc, 1sc, inc, 1sc, inc, 9sc, inc, 1sc, inc - 34sc
5. inc, 1sc, inc, 9sc, inc, 1sc, inc, 1sc, inc, 1sc, inc, 9sc, inc, 1sc, inc, 1sc - 42sc
6. slip stitch into next sc to close and fasten off leaving a long thread to sew to main piece
pin contrast section to main ball around the middle, it should go about 1/4 around the widest part and sew in place.
Now comes the interesting part. I took the green embroidery inspiration from the Halo 3 grenade pictures shown on halo.wikia.com but there are a few different varieties over the games, some easier to sew than others. Choose what you feel happiest with, or go with whatever game of the franchise you (or the recipent) raves about most. Remember the 4 wee lights at either side as well as in the pic below.
Your finished plasma grenade is a little smaller and lighter than the one Master Chief himself would use, but please only fling these at people who are expecting them and not near anything breakable, they may not go BOOM but they could still hurt and break ... thank you :D
As always if you do make one I would love it if you could link it on Ravelry ... thank you.
I am in no way affiliated with Xbox, Halo, Bungie or 343 ... this is just a little freebie fan art :D
Labels:
free pattern,
halo,
xbox
Saturday, 21 April 2012
Cockroach Free Pattern
The original inspiration for this was Spawn 2s love of the wee bug that was Wall-Es friend in the film ... he's terrified of anything other than ants, but loves this :D. It's pretty much any yarn with a hook a little smaller than the suggested to help prevent the stuffing showing through. The one in the pictures was done using chunky wool (about 20g of yarn i think) and a 4mm hook, but I've also done a Double Knitting (about 15g) version using a 3mm hook ... tension isnt really important for this. Anyway, freebie pattern time...
Materials
Oddments of bug coloured yarn
crochet hook a size smaller than yarn suggests (see above)
a yard of black yarn for eyes/mouth embroidery (or beads for eyes if not for a small child)
a little filling
tapestry needle
notes
worked in american terms... eg single crochet on this pattern is a UK/Aus double crochet. Worked in a spiral, ie do not slip join rounds or chain to next row, continue in next stitch, a row marker is helpful to define round start point.
body
starting at head end
2. (inc,inc,sc) twice - 10sc
3. (sc, inc, sc, inc, sc) twice - 14sc
4. to 7. work 4 rounds straight (ie 1sc into each sc)
8. inc in each of the next 4 sc, sc to end - 18sc
9. work 1 round
10. (inc, inc, work 7sc) twice - 22sc
11. to 18. work 8 rounds straight on these 22sc
19. work 1sc, (dec, work 3sc) to last sc, work 1 - 18sc
20. (dec, work 4sc) to end - 15sc
21. (dec, work 3sc) to end - 12sc ... stuff now for ease
22. (dec, work 2sc) to end - 9sc
23. work dec 4 times, sc in final sc - 5sc
fasten off leaving a thread for closing. push in a little more filling if needed, thread yarn through the stitches and pull tight to close hole
wings make 2 starting at tip
1. chain 2, work 4sc in 2nd chain from hook
2. (inc, sc,) twice - 6sc
3. work 1 round straight
4. (2sc, inc) twice - 8sc
5. (3sc, inc) twice - 10sc
6. (4sc, inc) twice - 12sc
7. to 14. work 8 rounds straight
15. (sc, dec) to end - 8sc
16. (sc, sc, dec) twice - 6sc
fasten off leaving a long thread to attach to body. do not stuff, flatten wing and pin in place on back behind "bump" made by the increases on row 8 of body. I sit them on so the very tips are slightly separate, attach behind head and secure in placewith a couple of stitches about 3-4 rows down the wing, this way they dont flap about too loosely.
sew on the face leaving at least 2 rows between the wings and the eyes to allow for feeler placement. loads of artistic license here to do what you feels looks best. As mine was for a 3yr old I gave him a smile :D
feelers make 2
chain 14, slip stitch into 2nd chain from hook then slipstitch into every other chain, fasten off leaving long thread to attach to head. Sew to head between the wings and eyes ... point them forward or back as you see fit. I positioned mine forwards.
legs make 6
chain 9, slip stitch into 2nd chain from hook then slipstitch into every other chain, fasten off leaving long thread to attach to body. Turn bug upside down and for ease mark center line with a pin (optional, you can use your own eye judgement if you want) ... attach 3 legs to either side of the center line as shown in the picture below
Sew any loose ends you may still have thru the body and snip off neatly, and ta-da finished bug
Hand to happy recipient
Pattern page can be found on Ravelry ... if you make one I would love it if you could link it.
Thank you xxx
Labels:
free pattern,
insect
Monday, 16 April 2012
Fez free pattern
Materials
3mm crochet hook
double knit white wool
tiny amounts of black, pink, red and yellow DK for details
tapestry needle and scissors
all instructions are written in american terms ... eg an american single crochet is a uk/australian double crochet and worked in the spiral (do not join round or chain to next round)
Body
starting at legs
- chain 2, work 5sc in loop
- increase in each sc - 10sc
- work 3 rounds on these 10 sc
- fasten off
- follow steps 1. to 3. to make another leg... do not fasten off
- work 3 chain (this will make the space between the legs) then starting where you fastened off on the 1st leg work the 10 sc around till you get back to the chain. Working along the chain do 2sc in the 1st ch, 1sc in the 2nd chain and 2sc in the 3rd chain, then continue around the 2nd legs 10 sc, then repeating the increases on the unworked loops of the chain work 2sc in the 1st loop, 1sc in the 2nd and 2 sc in the 3rd loop. you should now have 30sc in the round (2x10 from each leg and 2x5 in each space). place marker to identify rounds here
- work 11 rounds of sc on the 30 sc
- (work 1sc, 2sc together) around - 20sc ... stuff body now for ease
- (work 2sc together) around - 10sc
- work 1 round through front loops only (makes the neck)
- work 1 round through both loops
- fasten off and stuff neck
Head
- Chain 21
- sc in 2nd chain from hook to last ch, work 3 sc in last chain, turn work upside down,work 18sc in the unused loops on the other side of the chain, then 2sc in the last ch - 42sc
- work 10 rounds on these 42sc
- flatten work to find the corners and mark them with stitch markers or a bit of coloured wool. work sc around until you get 1sc away from the marker, work a 3scdecrease then continue to 1sc away from 2nd marker and work another 3scdec. complete the round and fasten off leaving a long thread
Arms (make 2)
- chain 2, 5sc in 2nd chain
- increase in each sc - 10sc
- work 4 rounds and fasten off
Fez using red
- chain 2, 6sc in 2nd chain
- increase in each sc - 12sc
- work 1 round back loops only
- work 3 rounds though both loops and fasten off
to make up
stuff head making sure you get the filling into the corners, and sew up the bottom seam making sure the corners are even. Embroider face using black and pink wool. if you check for game screenshots there are a few expressions, an open smiley mouth showing tongue is one of the more complicated ones but it worked for me :-). Note that the eyes are about half way down the head with the mouth JUST below that level
sew head to neck ... pin 1st to make sure you get it centered properly
stuff the arms and position and sew them onto the body ... top of arms approx between the first 2 decrease rounds at the shoulders
to make the fez tassle use 2 x 20cm strands of yellow dk, fold in half and make a big knot at the fold (overhand the end 3 or 4 times) thread the loose ends through the center top of the red fez (use tapestry needle) and pull the fez starting end tight so the hole closes fully around the tassle. use this red thread to secure the tassle firmer if you wish with a couple of stitches on the inside. Trim the loose ends neatly as in picture to make tassel. push a little stuffing into the fez and position and sew to the top of the head.
If you do make one i would love it if you could link it on Ravelry ... many thanks :D
please let me know if anything is not understandable or you feel something is wrong
I am in no way affiliated with either the makers of the game or Xbox. This is a free fan art pattern.
Labels:
free pattern
Saturday, 14 January 2012
parachute for mini soldiers
need ... a square of fabric, 2 lengths of wool (about 2 times the diagonal) a darning needle and a wee plastic soldier dude
using needle and wool poke a hole on the diagonal and tie the ends secure
repeat on other diagonal
find center of the 2 bits of wool and hold together, tie a knot leaving a wee loop to fit a soldier in
pop in the soldier dude
imagine wee soldier dude is now a paratrooper
Labels:
free pattern,
tutorial
Subscribe to:
Posts (Atom)